Setting up and using a multi-table relational database
INTRODUCTION
Most Expression Web books show how to view and edit results from, or add records
to databases using the asp.net controls that come with Expression Web. Their
examples generally use a single table database, for which Expression
automatically generates the needed queries for inserting, deleting, and updating
records.
In many situations however, developers are faced with the problem of using a
multi-table relational database, in which case Expression will not generate the
needed queries for editing and adding records unless the tables are properly set
up. This tutorial will show how to use a properly configured three-table
relational database, and how to make the queries required in order to use the
asp.net controls to allow users to add, edit, update, and delete records.
We will use a SQL2005 Express database for this tutorial and will assume you
know the basics of how to create tables and make relationships in a SQLExpress
database. We will show you what the database tables and their relationships
should look like. From there we will show you what this tutorial is about: how
to set up the asp.net controls, including the insert, update, and delete queries
to allow website users to access, add, modify, and delete data.
Although these tutorials are advertised as Expression Web tutorials, when you
work with SQL databases, you really need to use Visual Web Developer Express
(VWD) which is a FREE sister program to Expression for the initial set up your
website. Download it and use it to make a test website for use with this
tutorial. Setting up your website to work with databases is much easier with VWD
then Expression. VWD automatically creates the App_Data folder in which your
database will reside and allows you to choose "code behind" for any special
coding (which will not be needed for this tutorial). Use VWD to create your
website, and add new pages to it. Then use Expression (or VWD) to add and work
with the asp.net controls on your pages, and finally, use Expression for
dressing up the look and feel of your website.
If working with SQL databases and the asp.net controls are new to you, we highly
recommend the following reference book: "Sam's Teach Yourself ASP.NET 2.0 in 24
Hours" by Scott Mitchell ( ISBN number 0-672-32738-4 ) which will walk you
through setting up a website with VWD and creating a database.
SETTING UP THE DATABASE
The first thing to do is make the SQLExpress database. For the example we will
use a baseball database titled "PitcherStats3Table.mdf" which needs three tables
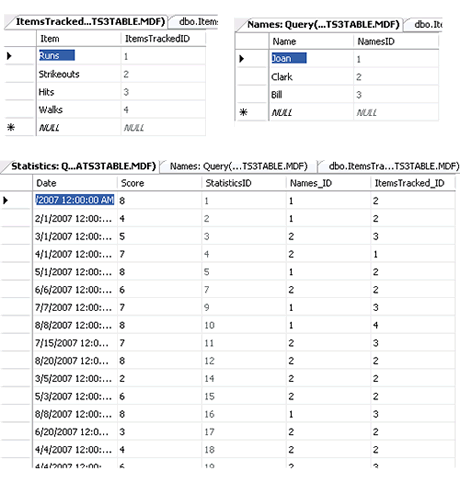
created. A table titled "Names" contains pitcher's names. Another table titled
"ItemsTracked" lists the items we are tracking (such as runs, hits, strikeouts
etc), and the third table titled "Statistics" contains the numbers (we called
them scores) for a pitchers results on a given game date. The Statistics table
needs to contain foreign keys from the ItemsTracked and the Names tables.
In the Database Explorer view of VWD, Right Click on the Views, and add a new
View named "Overall3Table" which contains the three tables, and connect the
relationships. The graphic below shows what right-clicking on the Overall3Table
View and selecting "Open View Definition" should look like.

The individual tables are shown (after some data has been added) below as
they should each appear in the "Show Table Data" View of the Database Explorer
in VWD.
Note: For the purpose of populating the database with a few test entries, you
can right click on the Names table using the Database Explorer View, select
"Show Table Data", and type in the names shown along with a few others (the
NamesID is assigned automatically). Do the same thing for the ItemsTracked table
to populate it with some entries. Likewise for the Statistics table as shown
below, but here you add a record by typing in a date, a score (say 5 runs), 1
for the ItemsTrackedID (that's the ID number for the Runs Item), 2 for the
Names_ID if you are entering data for pitcher Clark, and the database will
automatically fill in the StatisticsID when the query is run. If your Identity
Specifications and primary keys are properly set up for the tables and the
relationships properly defined, everything should work as below.
A consequence of properly setting up the relationships like this is that when we
make modifications, it is only necessary to update one table at a time. If you
want to track foul balls, you would just add that to the ItemsTracked table. If
you wanted to add more pitchers you would just add their names to the Names
table.
But most importantly, when you want to update a pitcher's statistics, you only
have to modify the Statistics table. This is important because you will run into
difficulty trying to update more than one table at a time.
We are now ready to begin the main tutorial, and show how to use this database
with the asp.net controls. Your test website should now have the
PitcherStats3Table.mdf in the App_Data folder.
USING ASP.NET CONTROLS WITH THE DATABASE
Configuring the Gridview data source
In VWD, create a new aspx page called baseballstats.aspx.
Drag a SQLDataSource from the Data toolbox onto the page, click on the expander
arrow, select configure datasource, click the New Connection button, for the
data source choose Microsoft SQL Server Database File, and browse to the
location where the database is stored on your computer. Click Test Connection to
verify the connection works.
Click Next, the Yes to save the connection string with a name you like, and then
Next again to bring up the configuration window.
To configure the Select statement, choose "specify columns from a table or view,
from the dropdown list choose Overall3table View you made earlier, and check
every box except the * box. Click the Order by button and select Name, then
Item, then Date if you would like the results ordered in that fashion.
Click Next, Test Query and Finish and your data source is now configured to
fetch the data. To view the data, drag in a GridView, and if the Gridview Tasks
does not already appear, click on the Gridview expander arrow, Choose data
source, and select the datasource you just configured (unless you renamed it, it
is called SqlDataSource1). Click on Autoformat and choose Professional. Save,
and Preview the page in your browser.
This should bring up the test data currently in the database.
At this point, save everything, close VWD, and open
the website in Expression Web, and we will finish the tutorial using Expression
(or you can keep using VWD).
Configuring the Gridview Insert, Update, and Delete Queries
Using Expression Web, open the baseballstats.aspx page, right-click on
SqlDatasource1 and select properties. In the data section of the properties
window, click on the Select Query, and on the little box with 3 dots.
This should bring up the Select Query that is generating the results in your
gridview, and it should look like:
SELECT [Item], [Date], [Score], [Name], [Names_ID], [ItemsTracked_ID],
[StatisticsID] FROM [Overall3Table] ORDER BY [Name], [Item], [Date]
However if you do the same thing for the Insert, Update, and Delete queries, you
will find they are all blank. Those queries were not automatically generated for
you because we were working with a View that consisted of multiple tables.
Insert, Update, and Delete queries must only deal with one table at a time, and
in our case it is the Statistics table. So we will write those queries by hand
below (another option would be to create a separate SQLDatasource that draws
data from just the Statistics table, in which case the queries can be generated
automatically)
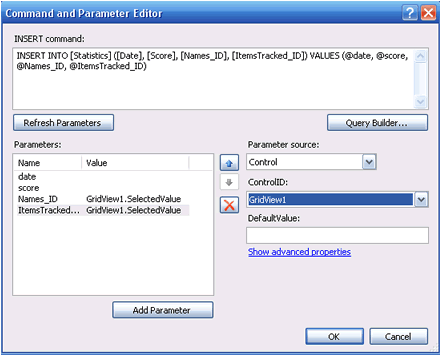
Open the Insert Query and type the following:
INSERT INTO [Statistics] ([Date], [Score], [Names_ID], [ItemsTracked_ID]) VALUES
(@date, @score, @Names_ID, @ItemsTracked_ID)
Click on the Refresh Parameters button. In the Parameters window, highlight
Names_ID, and for the parameter source select "Control", for the Control ID
select GridView1 (which is the name of the Gridview you created unless you gave
it a different name). Do the same for the Items_Tracked ID. When you are
finished the Insert Command and Property Editor window should look like:
Click OK to finish that, and open the Update Query. Type in the following query:
UPDATE [Statistics] SET [Date] = @Date, [score] = @score, [Names_ID] =
@Names_ID, [ItemsTracked_ID] = @ItemsTracked_ID WHERE [StatisticsID] =
@StatisticsID
Then repeat the process with the parameters similarly to what was just done with
the Insert Query. The result should look like:
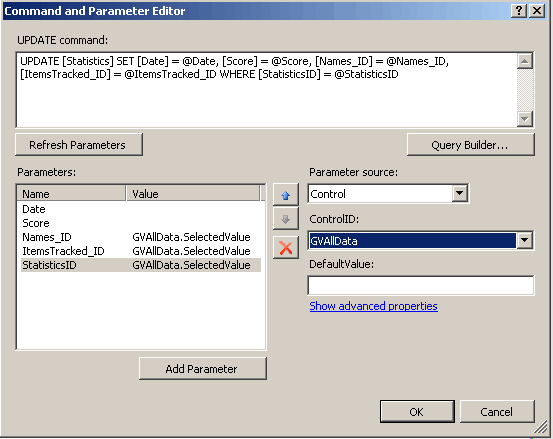
When the Names_ID, ItemsTracked_ID, and Statistics_ID are highlighted, the
parameter source should be "Control" and ControlID should be "GridView1"
Finally, repeat the process for the Delete Query:
Delete from [Statistics] WHERE [StatisticsID] = @StatisticsID
to produce the following result:

When you have finished these tasks, go back to the Gridview, click on the
Expander arrow, and check the boxes to enable selection, editing, and deleting.
Save your page, and Preview in browser. You will now be able to edit and delete
entries.
You can edit the date, score, Names_ID, and ItemsTracked_ID (the last two are
how the Names and Items are selected -- this will become clearer as we proceed).
INSERTING A RECORD INTO THE DATABASE
Drag a formview onto the page. Important step: In the tag properties pane for
the formview, under behaviors, set the default mode to Insert. This causes the
InsertItem template to be used by the formview, which is the template we will
use to arrange inserting records into the database.
Click the expander arrow for the formview and set the autoformat to
"Professional". Choose the data source SqlDataSource1 and immediately the
formview will show all the fields. To insert a record into that database, the
only fields we want are Item, Date, Score, Names_ID, and ItemsTracked_ID (the
Statistics_ID is not needed either since that number is assigned automatically
by the database when a record is added).
We need to remove the unneeded fields which we do by clicking the expander arrow
and selecting "Edit Templates". Then in the Display box make sure the InsertItem
template is shown. Click on the Item box and delete it. Ditto for the Name box
and the StatisticsID box.
Also delete the word "Item", the word "Name" and the word "StatisticsID". Click
on the expander arrow and select End Template Editing. Save, and preview in
browser.
At this point, you can actually add a record to the database by entering a date,
a score, the Names_ID of the person, and the ItemsTracked_ID of the item. Try
it, using one of the Names_ID and ItemsTracked_ID that exist in your database.
This is, of course, not practical. So what we will do next is replace the
Names_ID box with a drop-down list of the name choices, and the ItemsTracked_ID
with a dropdown list of the Item choices. Whichever of these are selected by the
user will get entered into the database.
We will be needing two new datasources -- one that returns just the list of
names and the other that returns just the list of Items so that we can use them
to populate the dropdown lists.
Drag a SQLDataSource Control below the formview. Configure the data source, and
choose the same connection string as previously. Select the Names table, and
check the Names and NamesID boxes, order by Name, check the "Return only unique
rows" box, and click on through the process. Click on SqlDataSource2, and in the
tag properties pane, rename it from sqldatasource2 to "NamesDataSource" just to
keep track of it.
Drag another SQLDataSource Control below that one. Configure the data source,
and choose the same connection string as previously. Select the ItemsTracked
table, and check the Items and ItemsTrackedID boxes, order by Item, check the
"Return only unique rows" box, and click on through the process. Click on that
newest SqlDataSource, and in the tag properties pane, rename it from to
"ItemsDataSource" just to keep track of it.
Now we will replace the two text boxes with dropdown lists. Go back to the
expander arrow on the formview, select Edit Templates, and make sure the
InsertItem Template is showing. Highlight the text box next to Names_ID. Note in
the Tag properties that it's ID is "Names_IDTextbox". Delete that textbox, and
drag into the same spot a DropDownList control. In the Tag Properties pane,
rename the ID of the DropDownList to "Names_IDTextbox" (that is the name
expected by the code that was generated when we made the formview).
Highlight the texbox next to ItemsTracked_ID. Note that the ID in the Tab panel
is "ItemsTracked_IDTextbox". Delete that textbox, and drag a dropdown list into
the same spot, and in the Tag properties pane, change the id of the dropdown
list to "ItemsTracked_IDTextbox" (again, since that is the name the code is
expecting) T
o configure the first dropdown list to show names, but return the names_ID of
the selected name, click on its expander arrow, choose data source, and select
NamesDataSource. Select Name for the data field to display, and NamesID for the
value of the dropdown field, and click OK.
Click Edit Databindings, for the SelectedValue Bindable property, select
Names_ID for the field bound to, check two-way databinding, and click OK. Make
sure enable autopostback is checked and you are done with the first dropdown
list.
To configure the second dropdown list to show ItemsTracked, but return the
ItemsTracked_ID of the selected name, click on its expander arrow, choose data
source, and select ItemsDataSource. Select Item for the data field to display,
and ItemsTrackedID for the value of the dropdown field, and click OK.
Click Edit Databindings, for the SelectedValue Bindable property, select
ItemsTracked_ID for the field bound to, check two-way databinding, and click OK.
Make sure enable autopostback is checked and you are done with the second
dropdown list.
Now one more change -- Since the first dropdown list shows names (even though it
returns the Names_ID to the code) change the text next to that dropdown list
from "Names_ID" to just "Name". Similarly, change the text next to the second
dropdown list from "ItemsTracked_ID" to "Item". This will make more sense to the
user.
Select End Template Editing. Close all expander arrows, save, and preview in
browser.
Congratulations! You now have a completely functional multi-table relational
SQLExpress database where records can be inserted via the formview and they can
be edited or deleted via the gridview.